Windsor® Pin system
A unique instrument for measuring the
strength of new or existing construction materials in situ utilizing
the established principle of resistance to penetration.
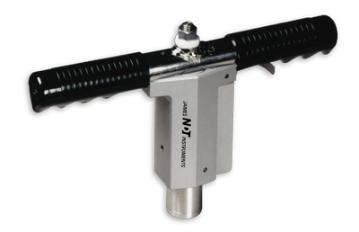
Measures the compressive strength of concrete, mortar and brick
in-situ, quickly and accurately. A non-explosive instrument, the
Windsor® Pin System uses a
spring-loaded device to drive a steel pin into the concrete (or
mortar). The depth of penetration of the needle correlates to the
compressive strength of the material under test. A removable chuck and
a small pin size facilitate the testing of mortar joints; this is the
only system for testing the in-place strength of brick mortar joints.
-
Portable and completely self-contained.
-
Safe to use - non explosive.
-
Economical - steel pin can be reused.
-
Non destructive.
-
Removable chuck facilitates testing of mortar strength in
masonry.
-
Conforms to ASTM C-803
-
Test new concrete products and structures for early strength.
-
Evaluate the "in-situ" strength of existing structures, e.g.,
after suspected fire damage.
-
Test strength of block, brick, and mortar joints within an
existing structure, e.g., load bearing walls.
-
Test polymer concrete and patching compound.
-
Quality control of precast elements such as block, brick slabs
and pipe.
The principle of the Windsor® Pin system is that a spring drives a
steel pin into the surface of the material. Since the depth of
penetration is inversely proportional to compressive strength, the
device provides a fast and safe way of determining the in situ strength
of material.
The spring is loaded by tightening the retraction nut until the
trigger mechanism latch closes to hold the spring in place. The stored
potential energy is 91 lbs. in (108 NM). With the spring loaded it is
compressed to a distance of 0.8 inches. Thus once the trigger is pulled
there is enough force to test compressive strength of concrete to a
maximum of 5300 PSI (36.9 MPA). The pin is made of a special high
strength steel specifically designed for building material penetration
and can be used about seven times. The Windsor
® Pin System comes with a
go/no go gauge to test the pin(s) after each use. If the length is
reduced sufficiently and the pin goes through the gauge, the pin(s)
should be replaced. Not doing so will severely impact test results.
With the chuck on both the micrometer and the pin driver, flat
surfaces can be easily and accurately measured. Simply make sure the
chuck rests against the surface and pull the trigger. After the pin has
penetrated the surface, clean the hole with the blower provided and
measure depth of penetration. Compare this penetration depth to the
previously prepared chart for the compressive strength of your
material. Strength charts for typical mortar and concrete are provided
with the unit.
The recommended practice is to take seven readings and discarding
the two readings farthest from the mean. By doing this, the
possibilities of accidently striking a flaw or near surface piece of
hard aggregate, and using the resulting penetration to calculate
strength; are sufficiently reduced. By grinding the test surface flat
before testing, a more consistent result can be produced.
With the chuck removed, the pin driver is capable of accurately
testing mortar joints. By inserting the V-barrel into the mortar joint,
the pin will directly penetrate at the center of the joint. Then by
following similar procedures as above, the compressive strength of the
mortar joint can be accurately and safely tested. A similar V-shape on
the micrometer facilitates
measurement.
The spring of this instrument has been selected for its ability to
undergo many compression cycles with no loss of energy. However, it is
recommended that the instrument be sent back to James Instruments (or
an authorized distributor) for cleaning, recalibration, and replacement
of the brass loading nut, at least once every year.
|
W-P-2000
|
Windsor® Pin System
|
|
W-P-1040
|
Box of
40 pins with gauge for Windsor
® Pin system
|
|
Weight
|
18
lbs.(8.1 Kg)
|
|
Dimensions
|
17 x 12
x 6 inches (43 x 30 x 15 cm)
|
Windsor® Pin SYSTEM OPERATING PRINCIPLE
A spring-loaded device drives a steel pin into the surface of
concrete or mortar and the depth of penetration is measured. Since the
depth of penetration is inversely proportional to compressive strength,
this system provides a fast and efficient way of determining the in
situ strength of material.
The spring is loaded by tightening the loading nut until the trigger
mechanism latch closes to hold the spring in place. The stored
potential energy is 91 lbs. in (108 NM). With the spring loaded, it is
compressed to a distance of 0.8 inches. Thus, once the trigger is
pulled there is enough force to test the compressive strength of
concrete to a maximum of 5300 PSI (36.9 MPa).
The pin is made of a special high-strength steel specifically for
building material penetration and can be used up to seven times. The
pin should be replaced if the length is reduced sufficiently enough for
it to pass through a go/no-go gage.
PIN
PENETRATION RESISTANCE TEST PROCEDURE
-
Insert a new pin into the chuck.
-
Tighten the loading nut until the trigger mechanism latch closes
to hold the spring in place.
-
It is very important to back off the loading nut completely to
the top of the load screw before pulling trigger. Failure to do so will
result in damage to the threads of both nut and spindle.
-
Place the instrument on a smooth flat surface of the material to
be tested (2-3 square inches). If necessary use a grindstone to prepare
the surface.
-
Place the instrument perpendicular to the test surface and pull
the trigger. The instrument should be held firmly against the surface,
particularly when testing vertical walls and ceilings.
-
With the chuck removed, the V-shaped barrel can be inserted
directly into the mortar joint ensuring pin penetration at its
center.
-
Remove the instrument, then using the rubber bulb-type blower,
clean out the small hole made in the material surface.
-
Place the micrometer over the hole, making sure that the
reference surface of the micrometer is flat on the material (For
measuring mortar joints, the micrometer utilizes a V-shaped barrel
similar to the pin driver.)
-
Insert micrometer probe to the bottom of the hole using the
knurled thimble on the head of the micrometer.
-
Read and note the micrometer reading. Remove chuck to expose
V-Shaped barrel if measuring in a mortar joint.
-
After each strike, check the steel pin in the go/no-go gauge
provided - located in the plastic box containing 40 steel pins. If the
pin can easily pass through the slot in the gauge, or it appears too
blunt, it should be discarded and a new one selected. (
Note:
When checking the length of a used pin, make sure that it is parallel
to the surface of the gauge.)
-
Repeat the above procedure seven times and reject the two
readings farthest from the mean.
-
Average the five best remaining point readings and, using the
charts provided, look up the corresponding compressive strength. If the
pin is too blunt or too short, the strength of the material can be
considerably overstated.
The strength of
the concrete and mortar can be determined by reading the depth micrometer
directly, and then
using the strength table below.
(Note:
the micrometer provided does not read the actual depth of
penetration;
instead this value can be obtained by subtracting the micrometer
reading from
one inch as seen in the far right column. The mm penetration can be
seen in
the center column.)
Windsor® Pin Strength Table.pdf
Downloadable Instruction Manual
Q. I have a concave mortar joint;
can the Windsor
® Pin test it?
A. Yes, just remove the flat plate on the Driver Unit to expose the
V-shaped tip. Don't forget to do the same with the depth gauge when taking a reading.
Q.How many tests do you get from
each pin?
A. Depending on the strength of the material being tested, you
should get anywhere from three to five tests per pin.
Q.How accurate is the Windsor® Pin System?
A. With the proper correlation testing, the Windsor® Pin can get you
within 10 percent of the actual "in place" strength. Just like most NDT
tests, you get your best results with a direct correlation of cores,
cylinders, or prisms to match with the pin penetration.
Q. Can you over load the Driver
Unit?
A. Yes, we recommend users to tighten the rear Nut only until the trigger pops "out" (or clicks in place), then to back off the Nut before firing the Driver unit.
Q. Can the Windsor® Pin System be used to test Grout? to test Brick?
A. Yes, but both require the user to create their own correlation Strength Charts for the materials being tested. This means recording the test readings, and later matching them to the results done in a lab of the compressive strength of the same material(s).


